
How Do You Snap to Grid in Figma?

Snap to grid is a feature that helps in aligning objects and elements on a design canvas to a predefined grid. It ensures that elements are positioned accurately and consistently, creating a visually pleasing layout.
How Do You Snap to Grid in Figma?
In Figma, the process of snapping to grid is quite intuitive. By default, Figma automatically snaps elements to the grid. However, if you specifically want to snap to the pixel grid, follow these steps:
Open your design file in Figma.
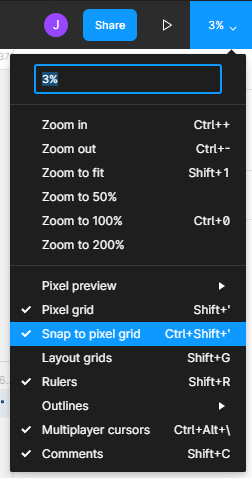
Locate the top bar, which contains various tools and settings. On the right side of the top bar, you will find the zoom settings represented by a percentage.
Click on the zoom settings to expand the options. In the expanded options, you will see the "Pixel Grid" option.
Click on the "Pixel Grid" option to enable snapping to the pixel grid. Once you have enabled the pixel grid, Figma will snap your objects and elements to the pixel grid, ensuring precise alignment and pixel-perfect designs.
Conclusion
Snapping to grid is an essential feature in design tools like Figma, aiding in the creation of well-aligned and visually appealing designs.
Figma simplifies the process by automatically snapping elements to the grid by default. If you desire more control and want to snap to the pixel grid, Figma offers the option to enable this feature through the zoom settings on the top bar.
